• Welcome
  • Entertain
  • Decorate
  • Food & Drink
  • About
  • Contact
Menu

Redefining Domestics

Street Address
Washington, DC
Phone Number

Practical applications for turning your house into a home.   

Redefining Domestics

  • Welcome
  • Entertain
  • Decorate
  • Food & Drink
  • About
  • Contact

DIY Valentine's Day Garland

February 3, 2016 Callie Cagney
Valentines Day Garland Step 6.JPG
Valentines Day Garland 2.jpg
Valentines Day Garland 3.jpg

With Valentine's Day less than two weeks away, preparations for this day of romance have officially commenced!  I know that many disregard Valentine's Day as the "Hallmark Holiday," but I really enjoy having fun with this holiday.  Sure you should celebrate your significant other all year long, but it's still fun to have a day that's strictly devoted to love and romance.  

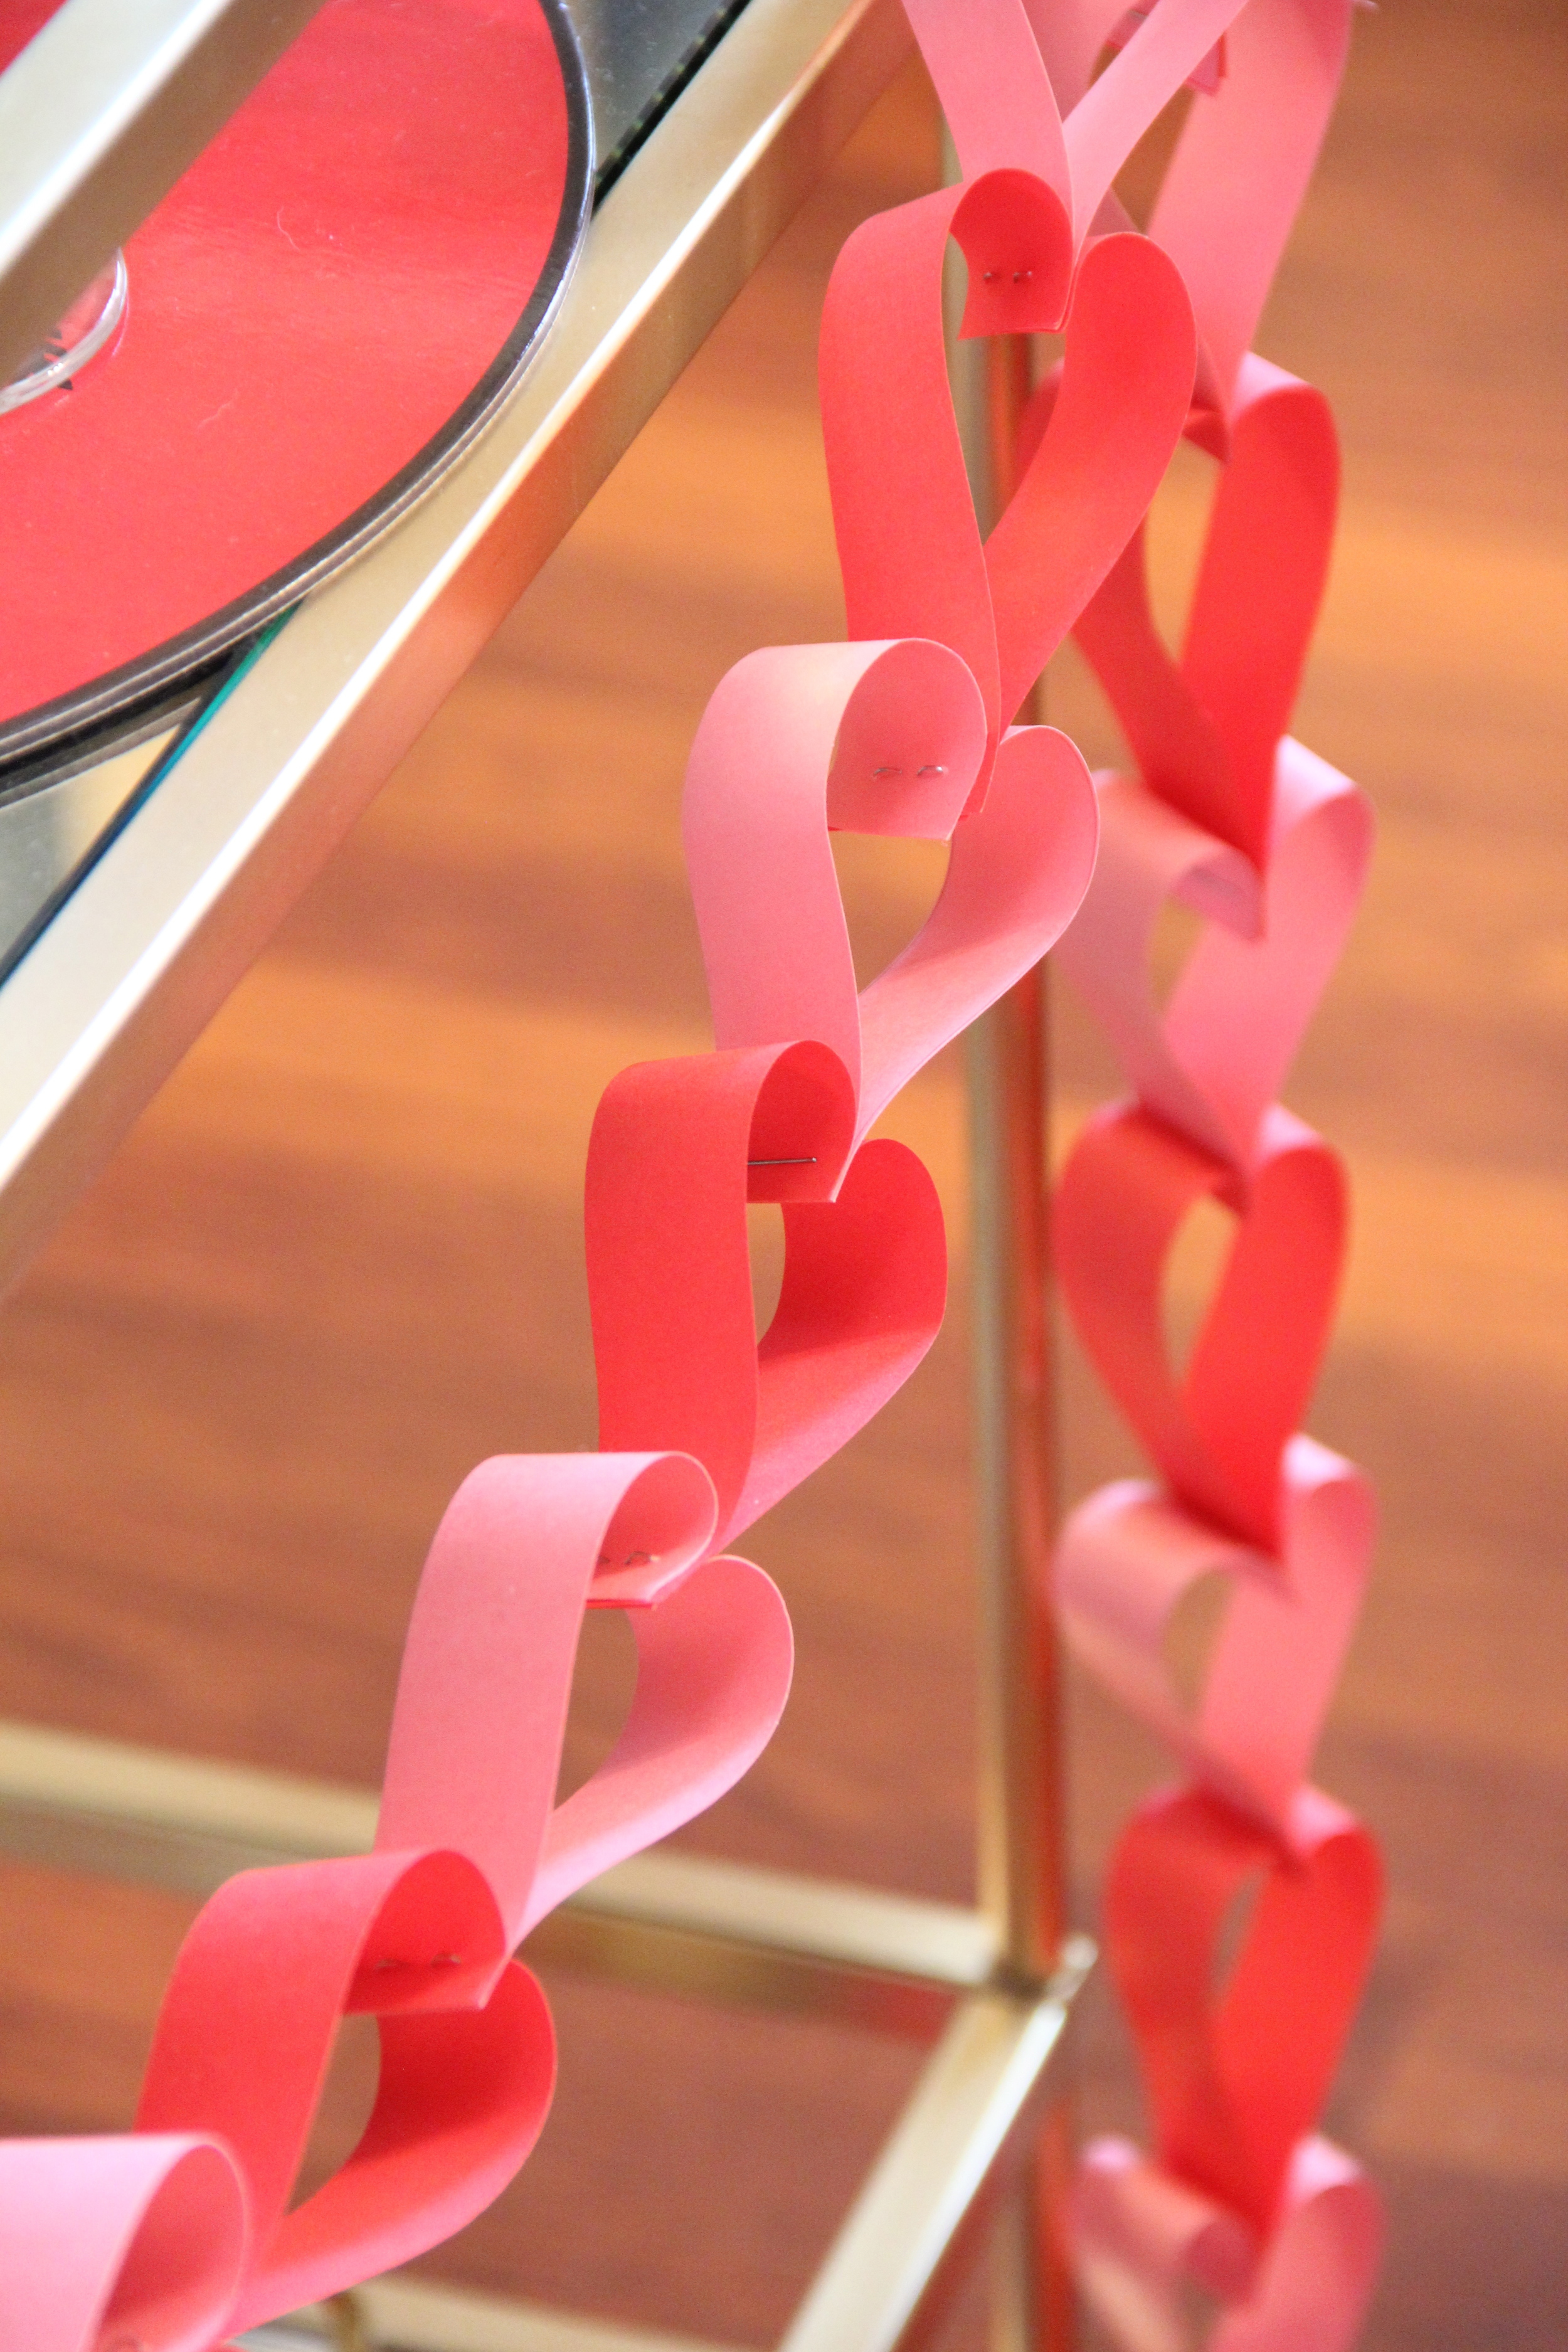
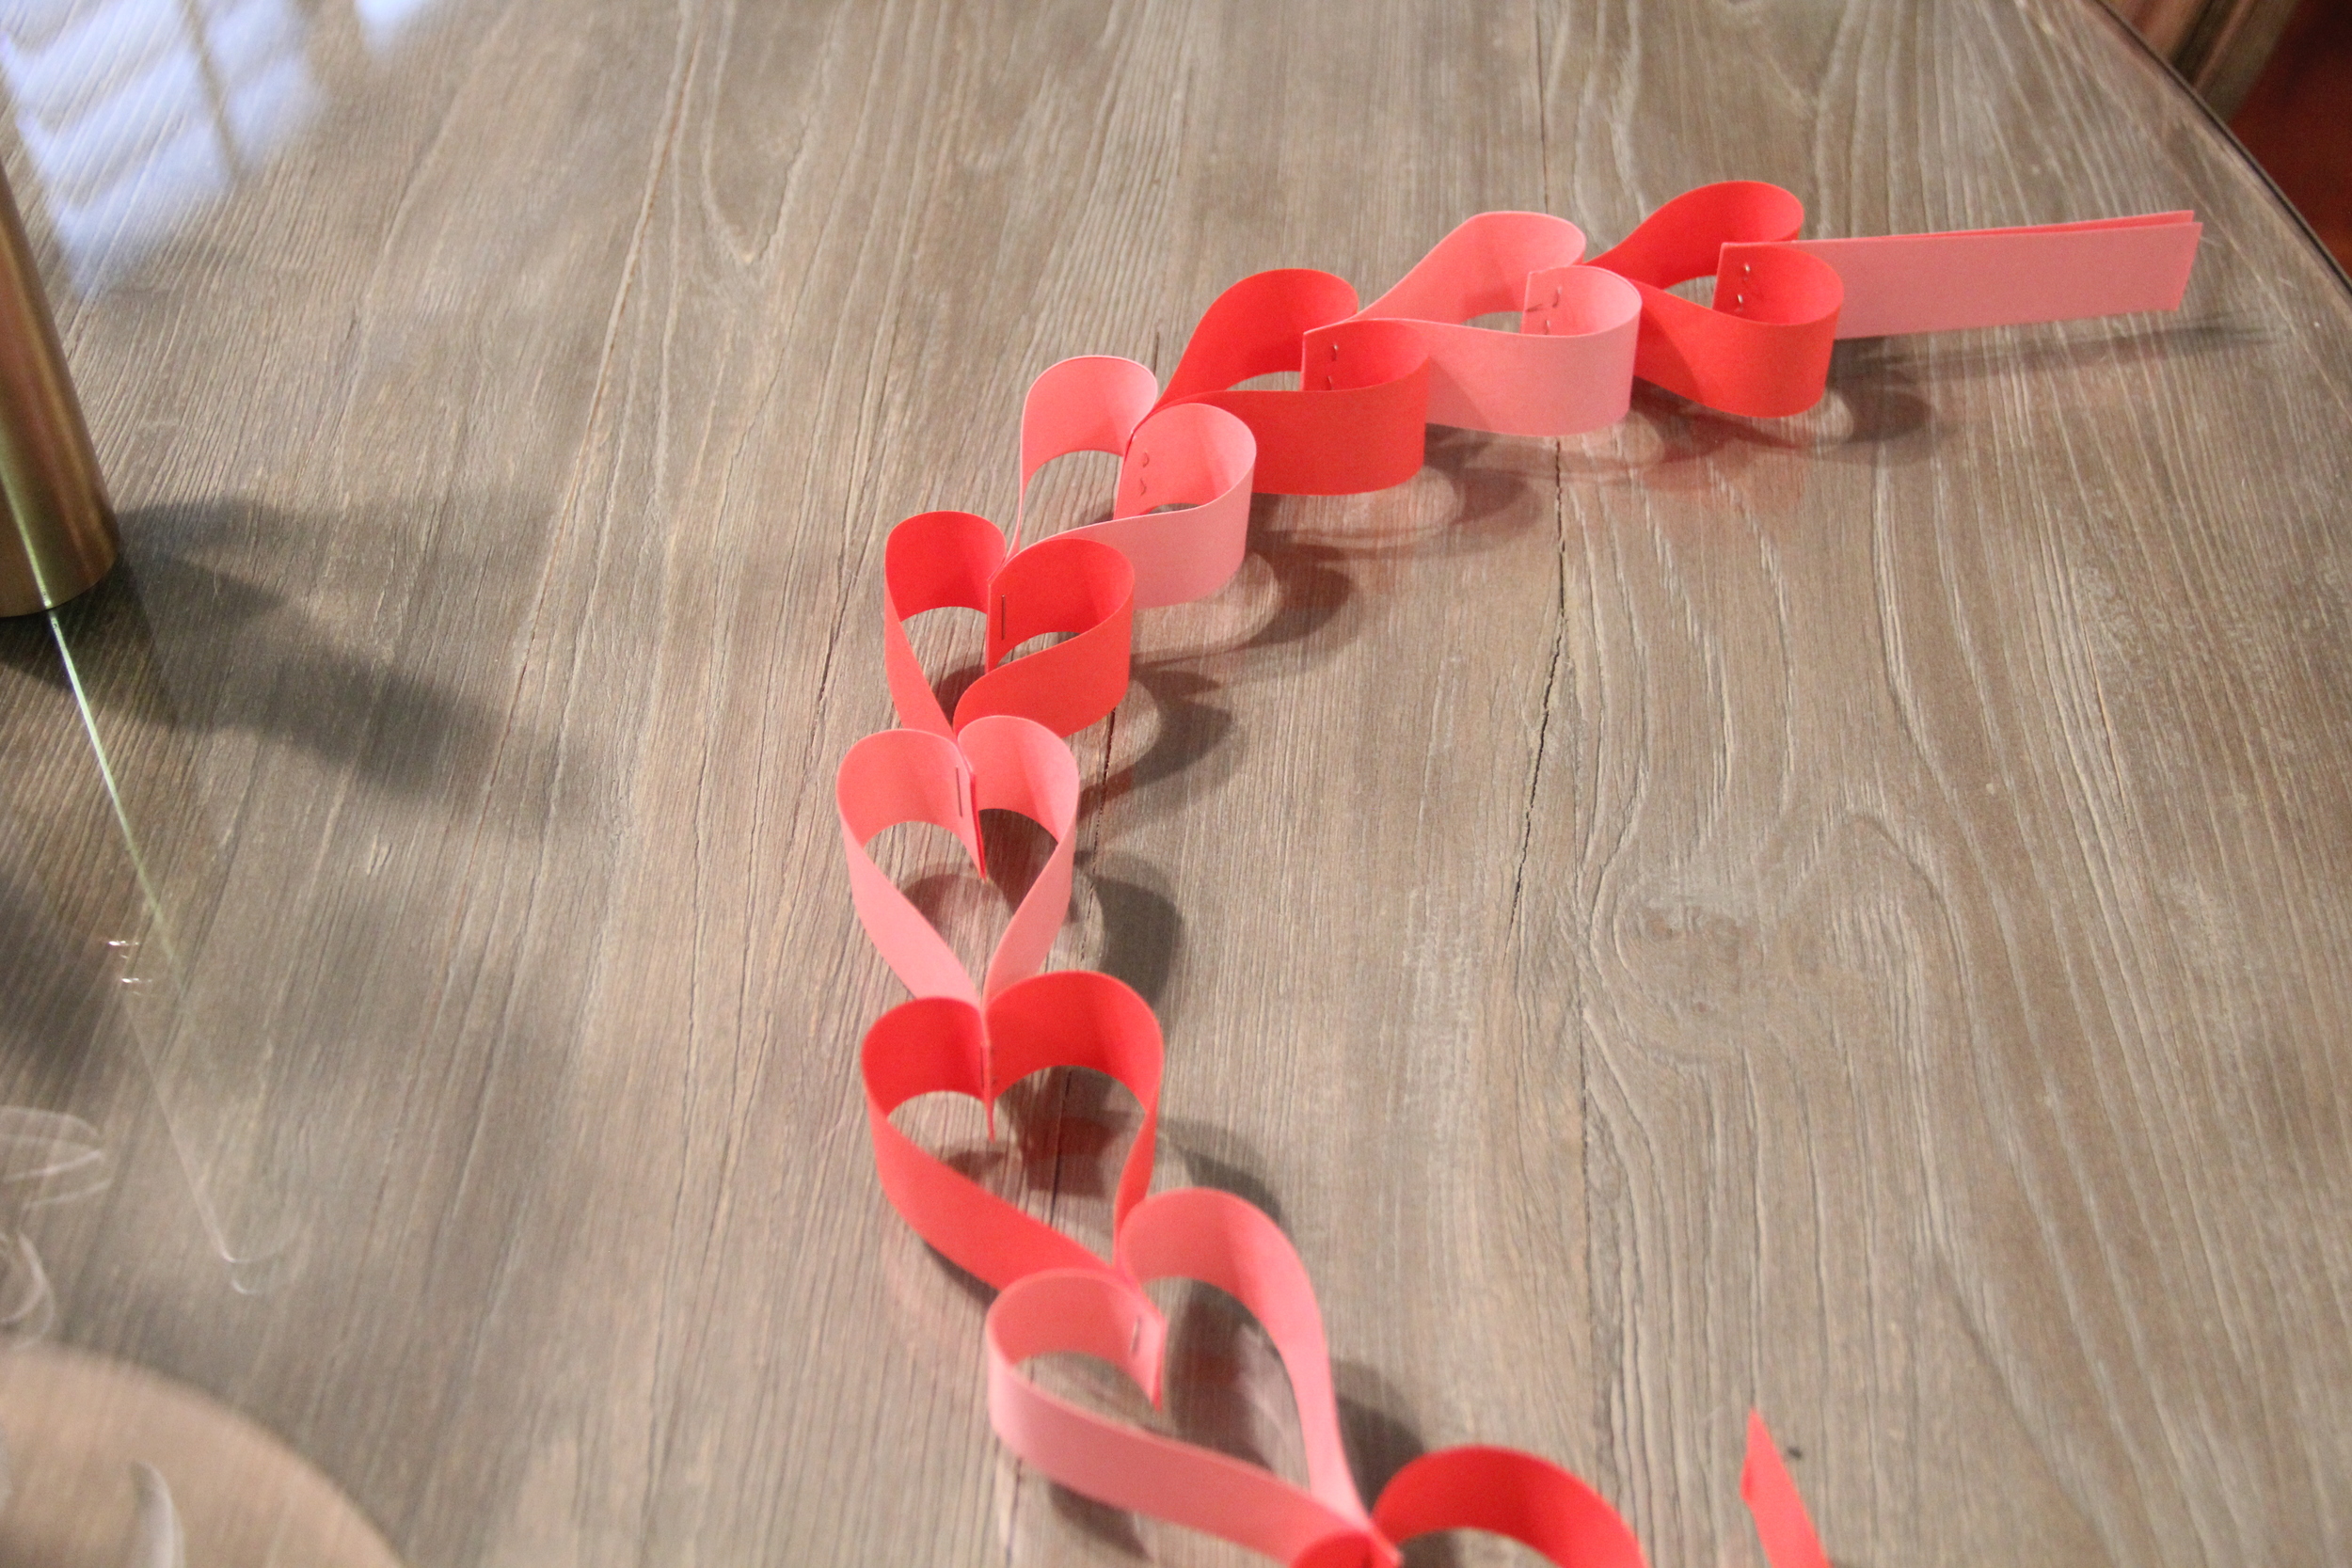
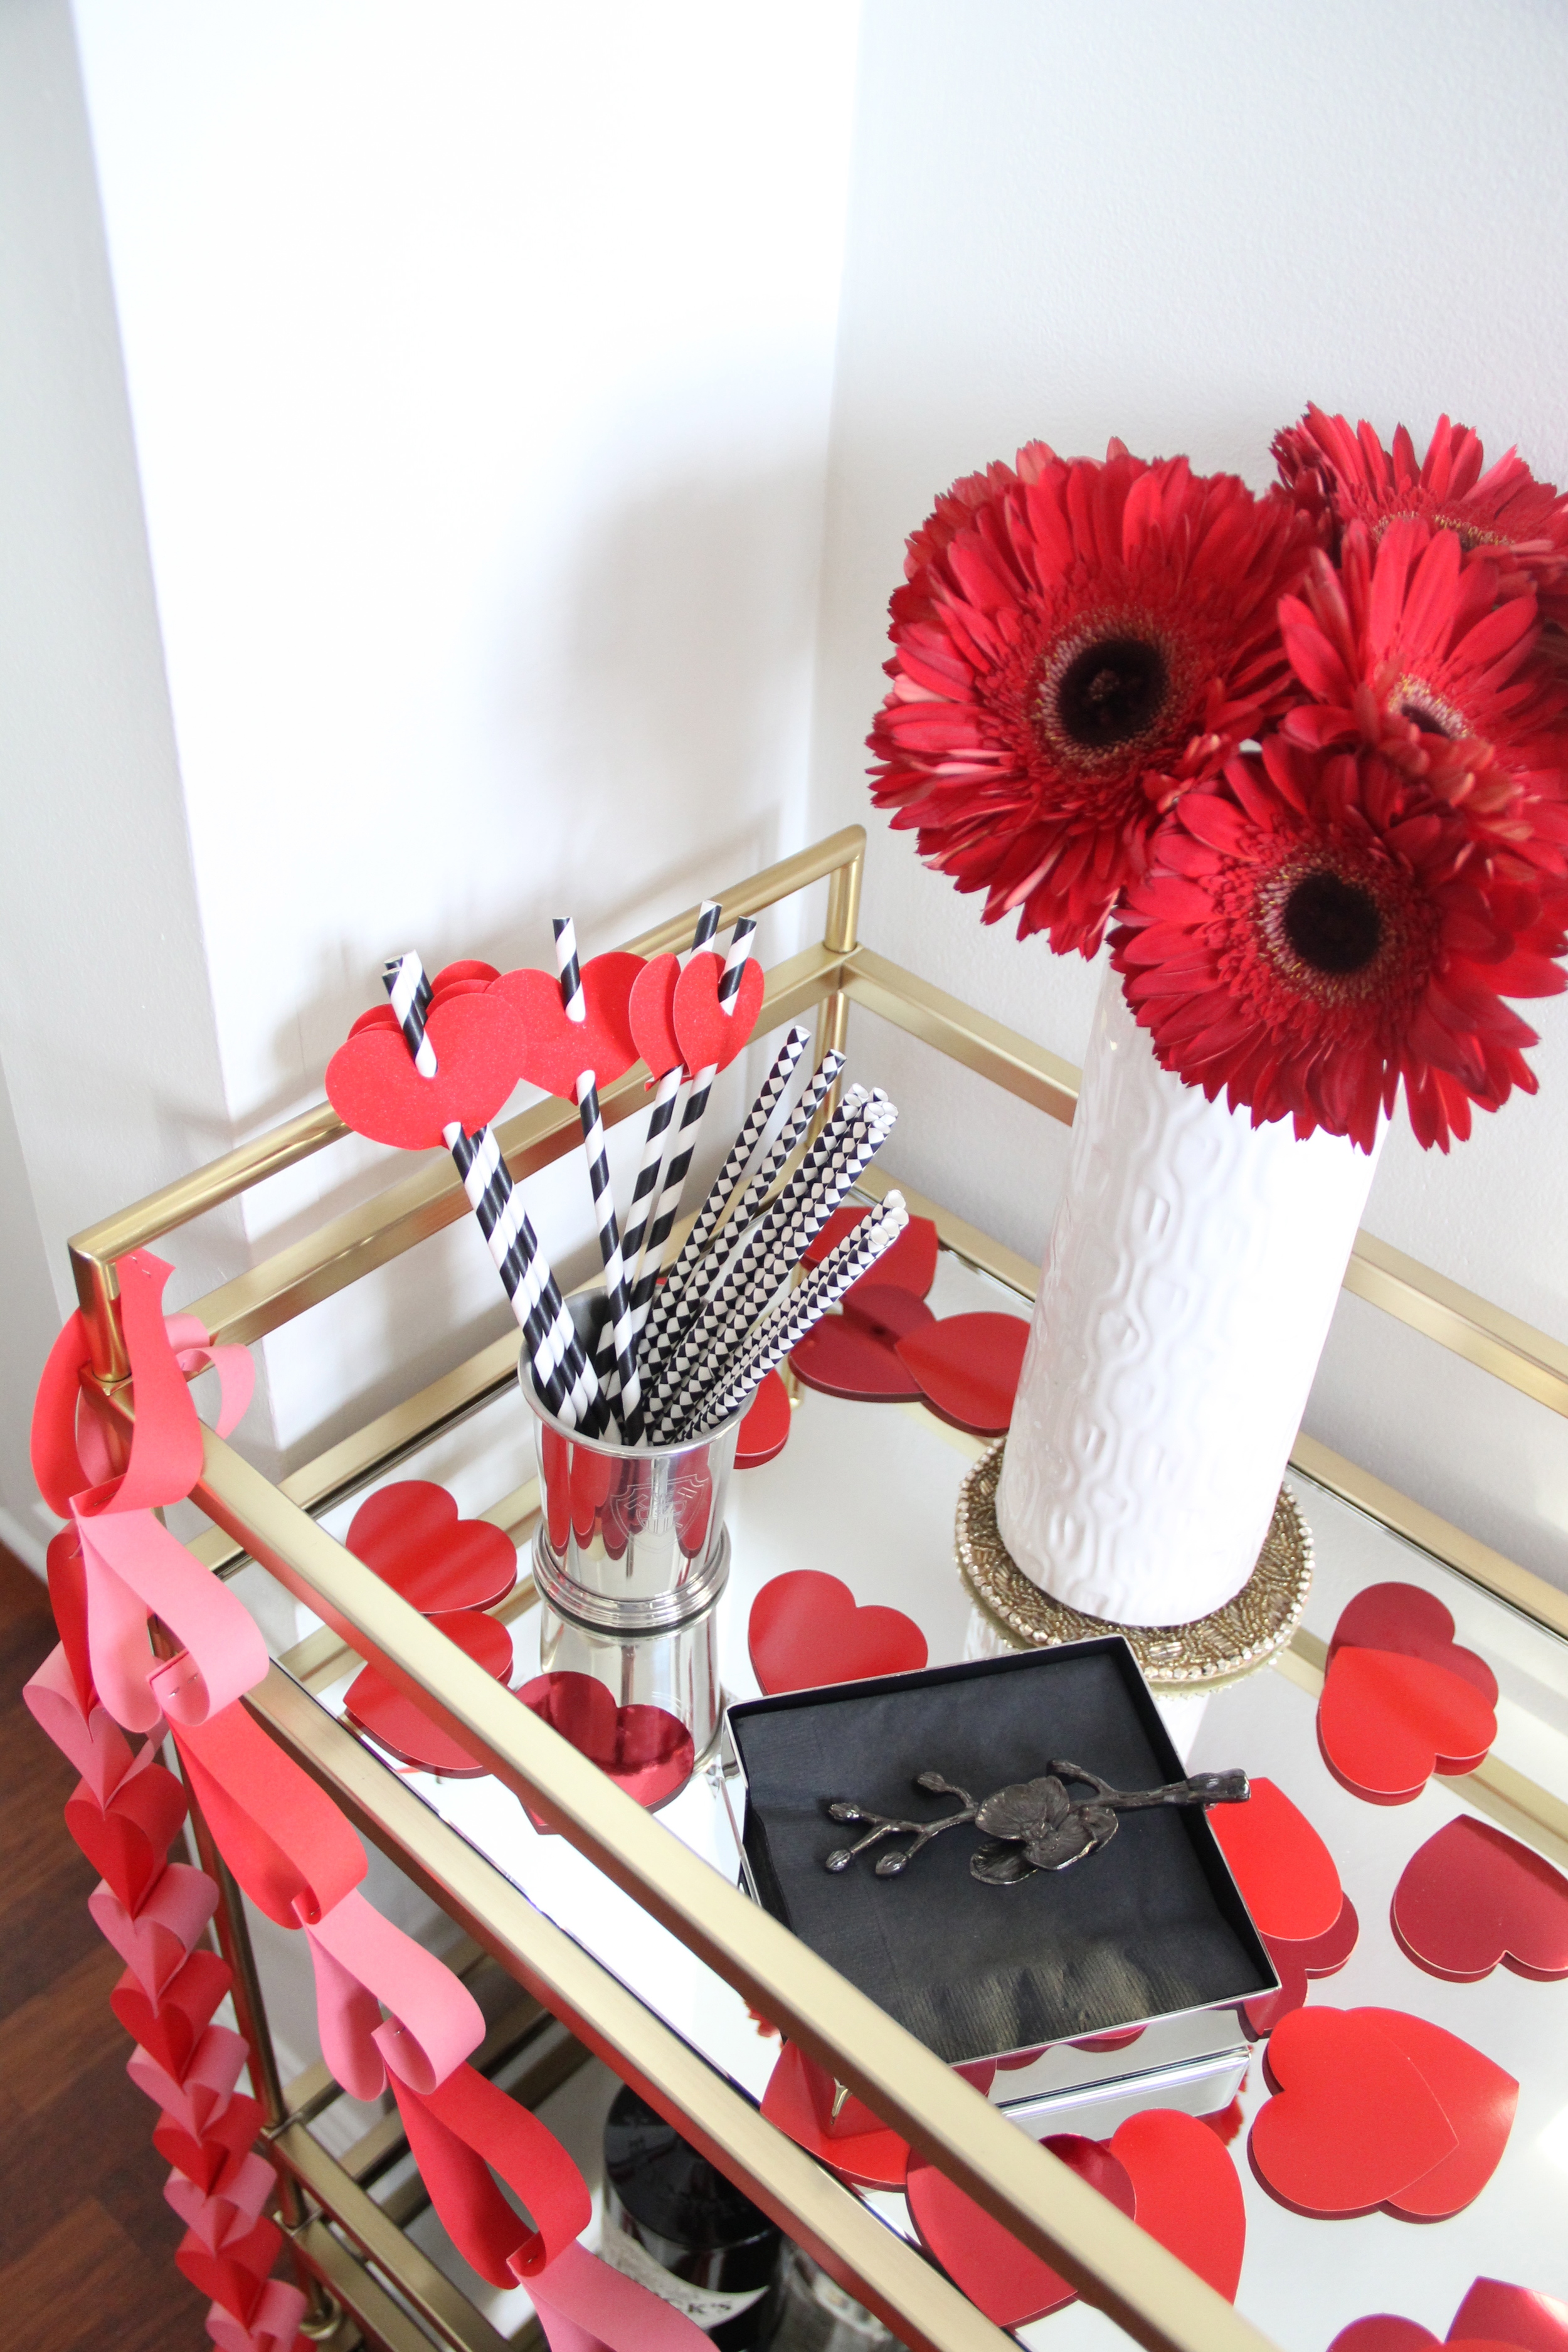
This Valentine's Day I have a few fun and festive projects planned, starting with the most basic and essential…decorating my bar cart!  I know this sounds a little ridiculous (and maybe it is), but I plan on serving up a very special champagne bar cart on Valentine's Day to enjoy with my husband before dinner.  There is nothing more romantic and elegant (in my opinion) than enjoying a delicious bottle of champagne together.  To get my bar cart holiday ready, I am going to start with the decorations.  Specifically, this adorable DIY Valentine's Day garland made out of colored paper.  It's easy to make and really adds a festive feel to any space.   

Valentines Day Garland Step 1.JPG

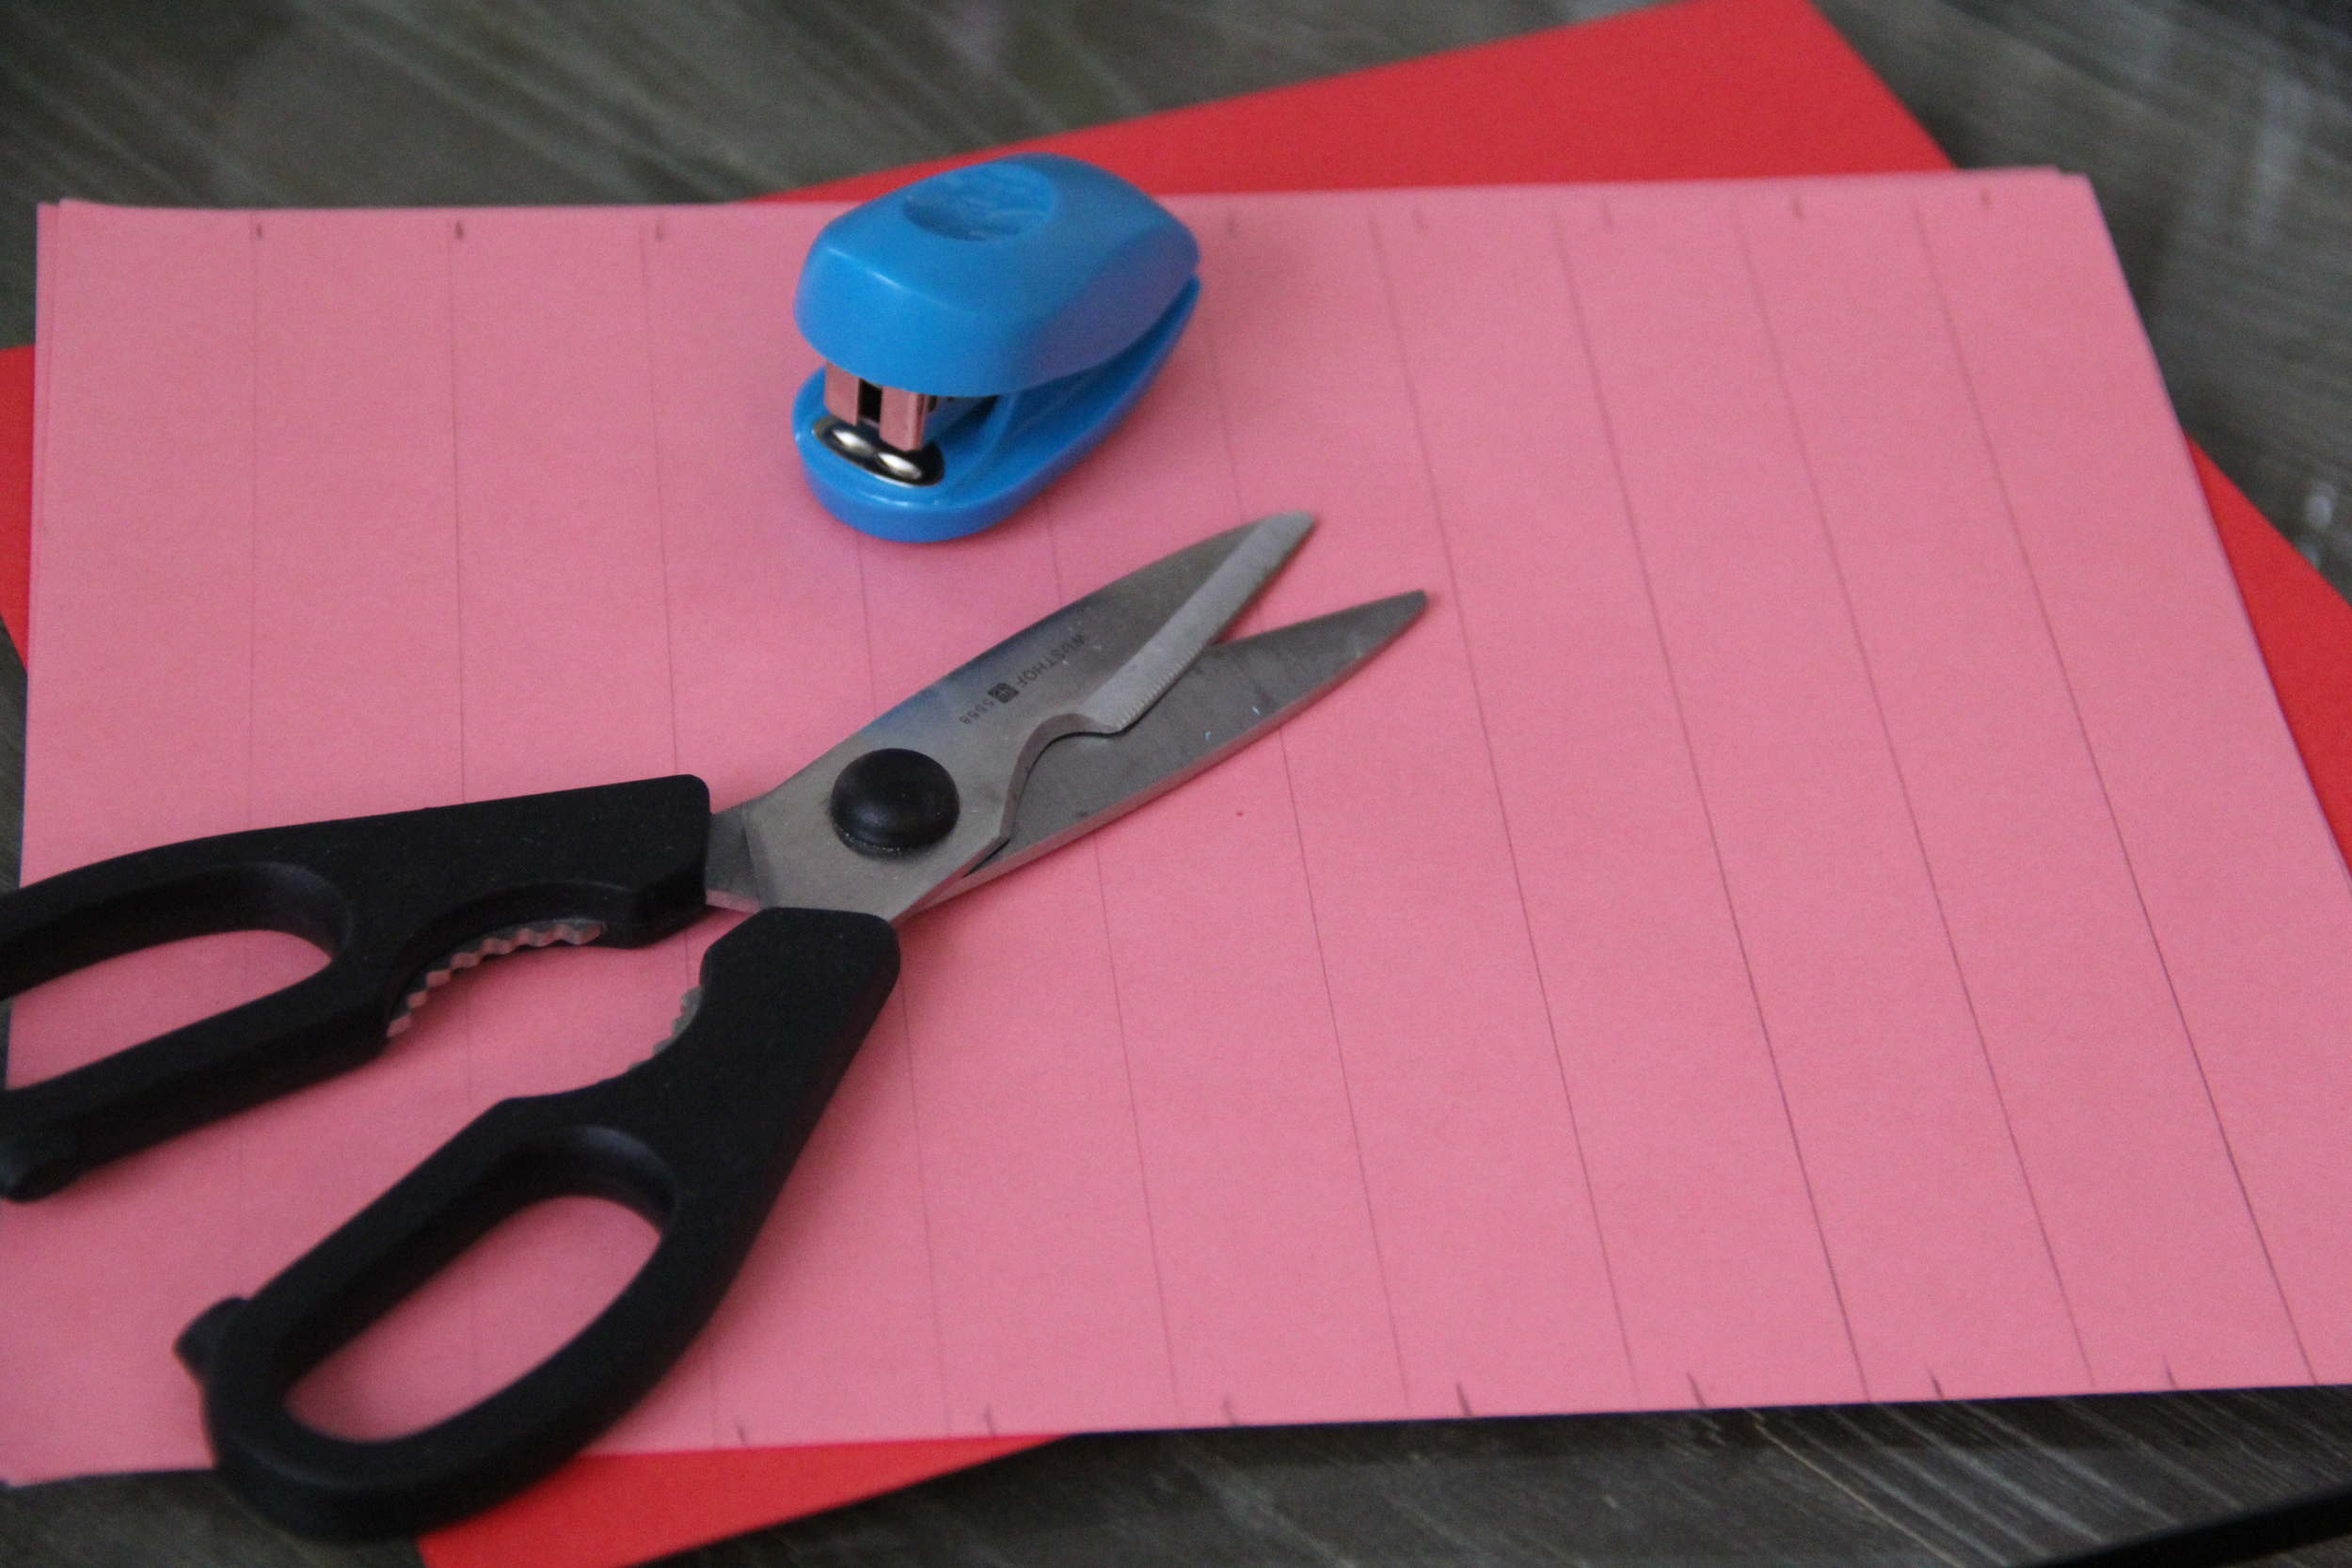
What you will need... 

  • Stapler
  • Ruler
  • Pencil
  • Scissors
  • Red and Pink Printer Paper
Valentines Day Garland Step 2.JPG
Valentines Day Garland Step 3.JPG
Valentines Day Garland Step 4.JPG
Valentines Day Garland Step 5.JPG
Valentines Day Garland Step 7.JPG
Valentines Day Garland 4.jpg
IMG_4734.jpg

Instructions

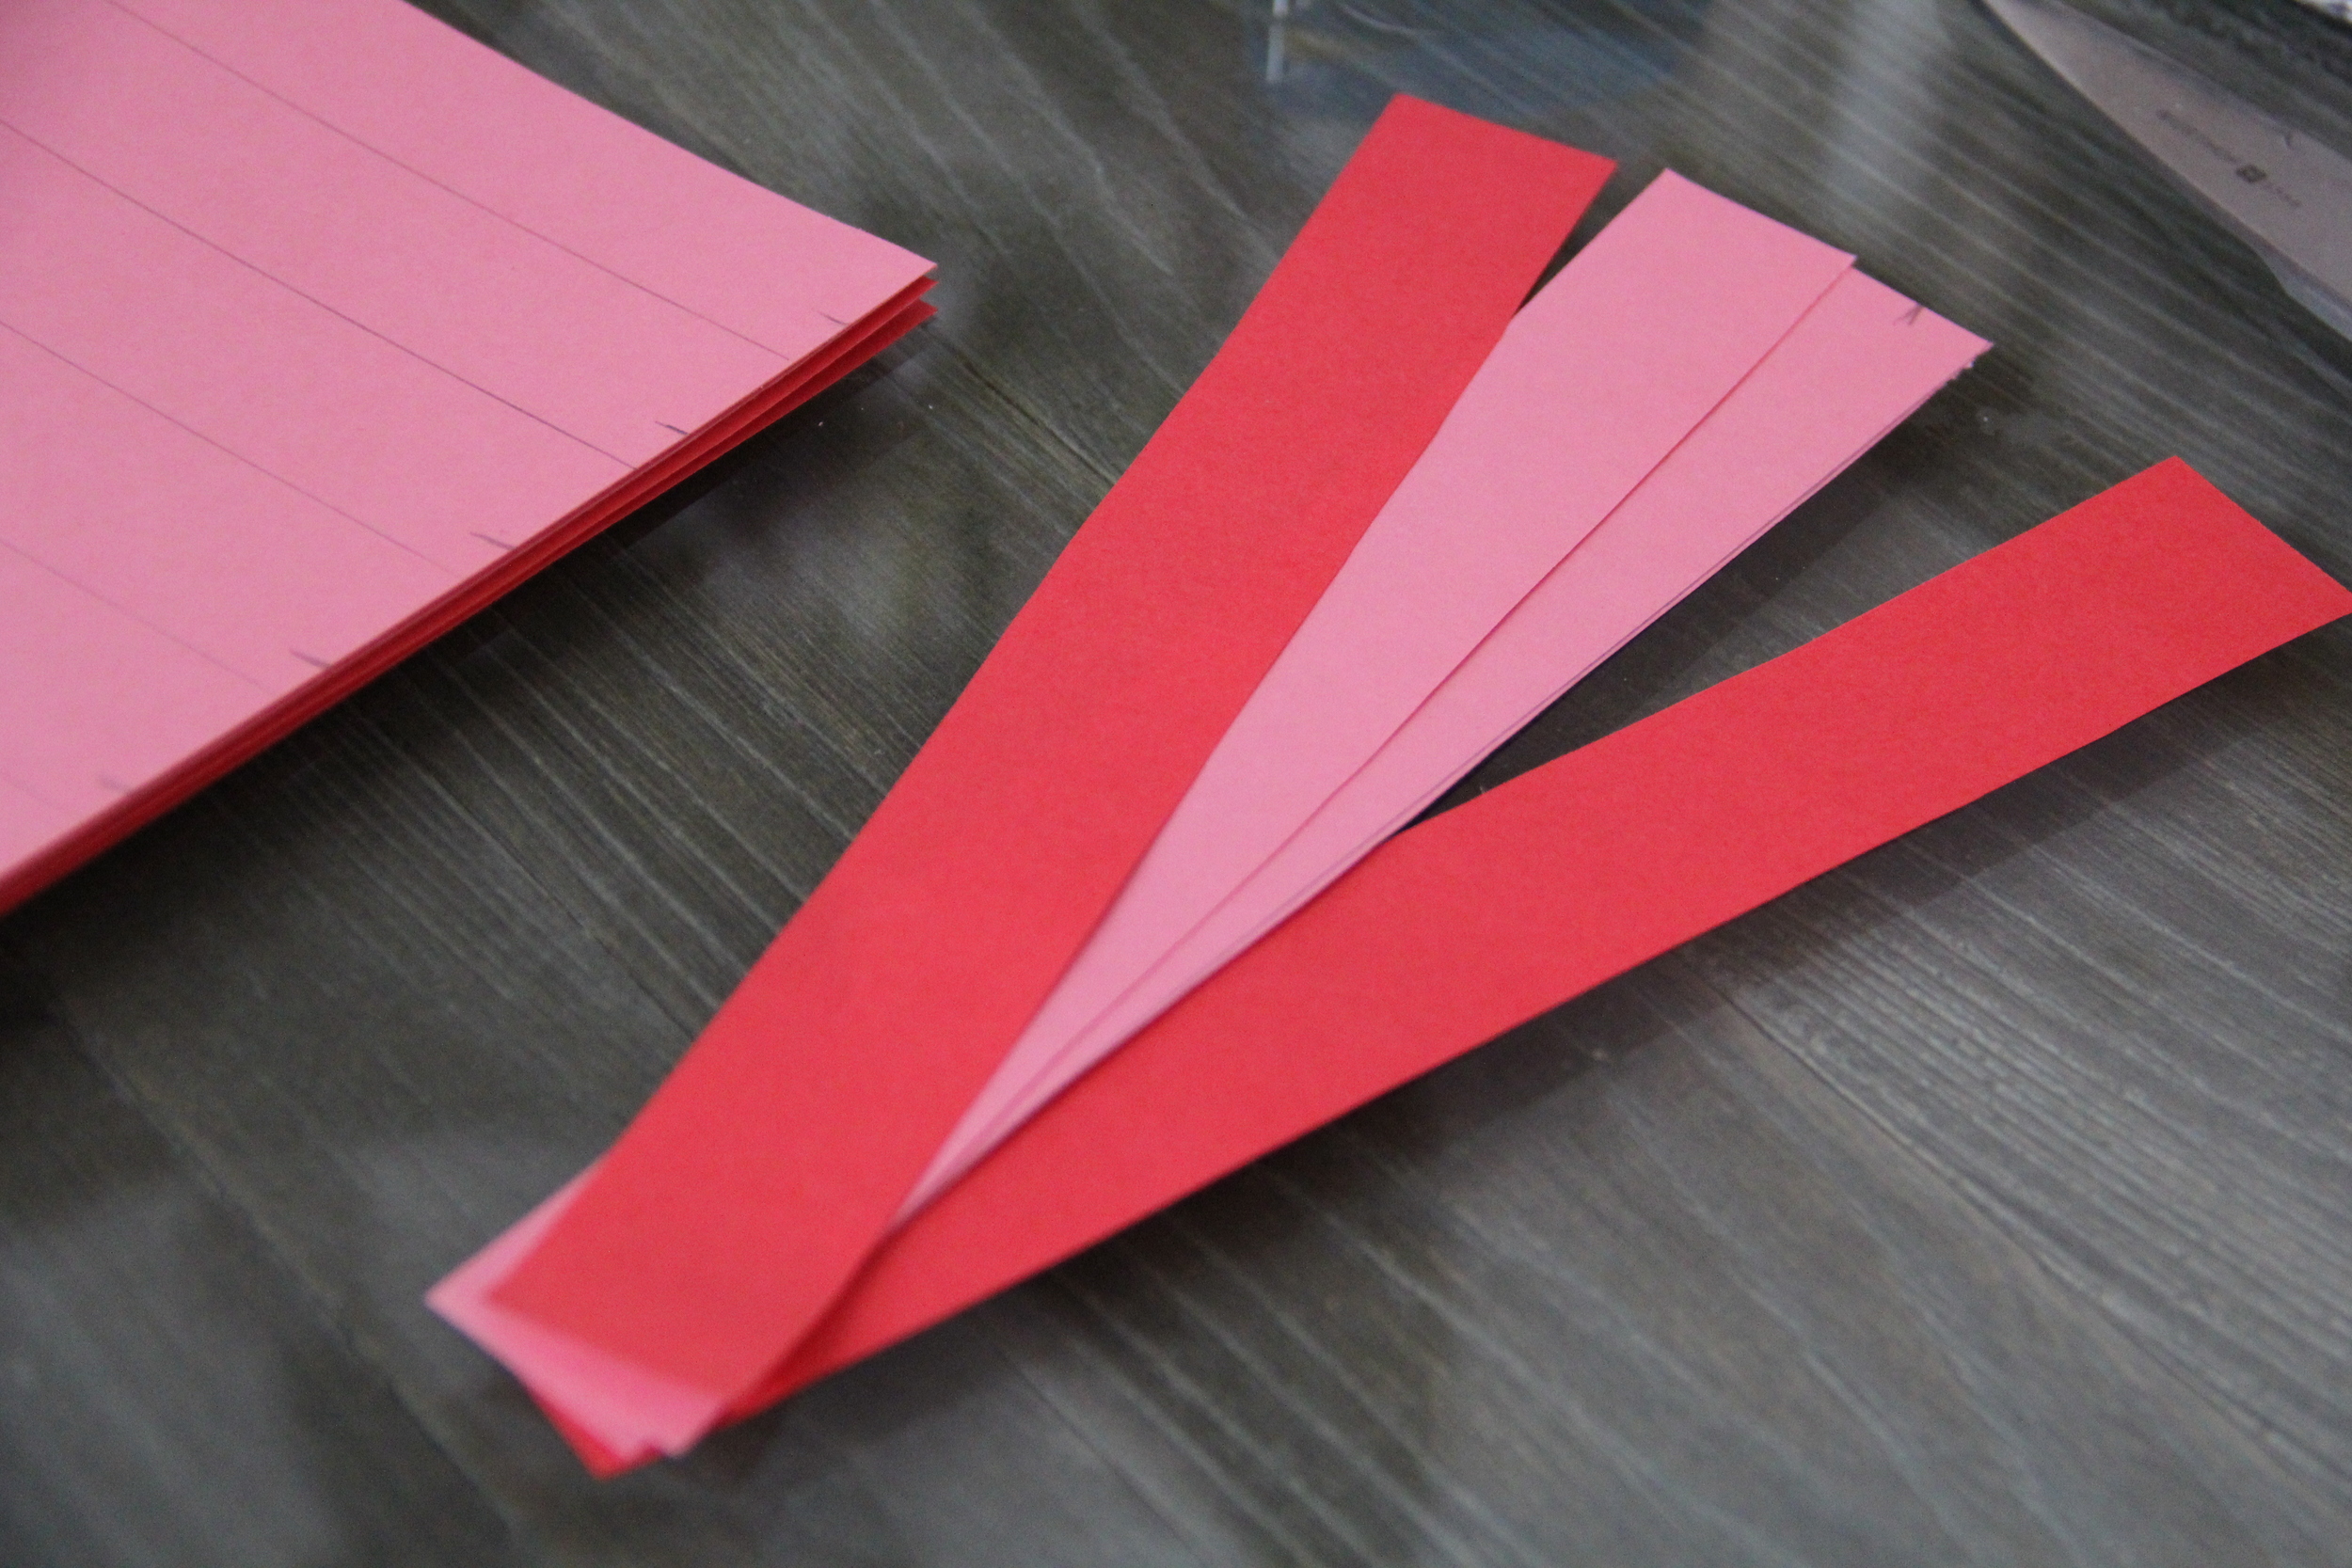
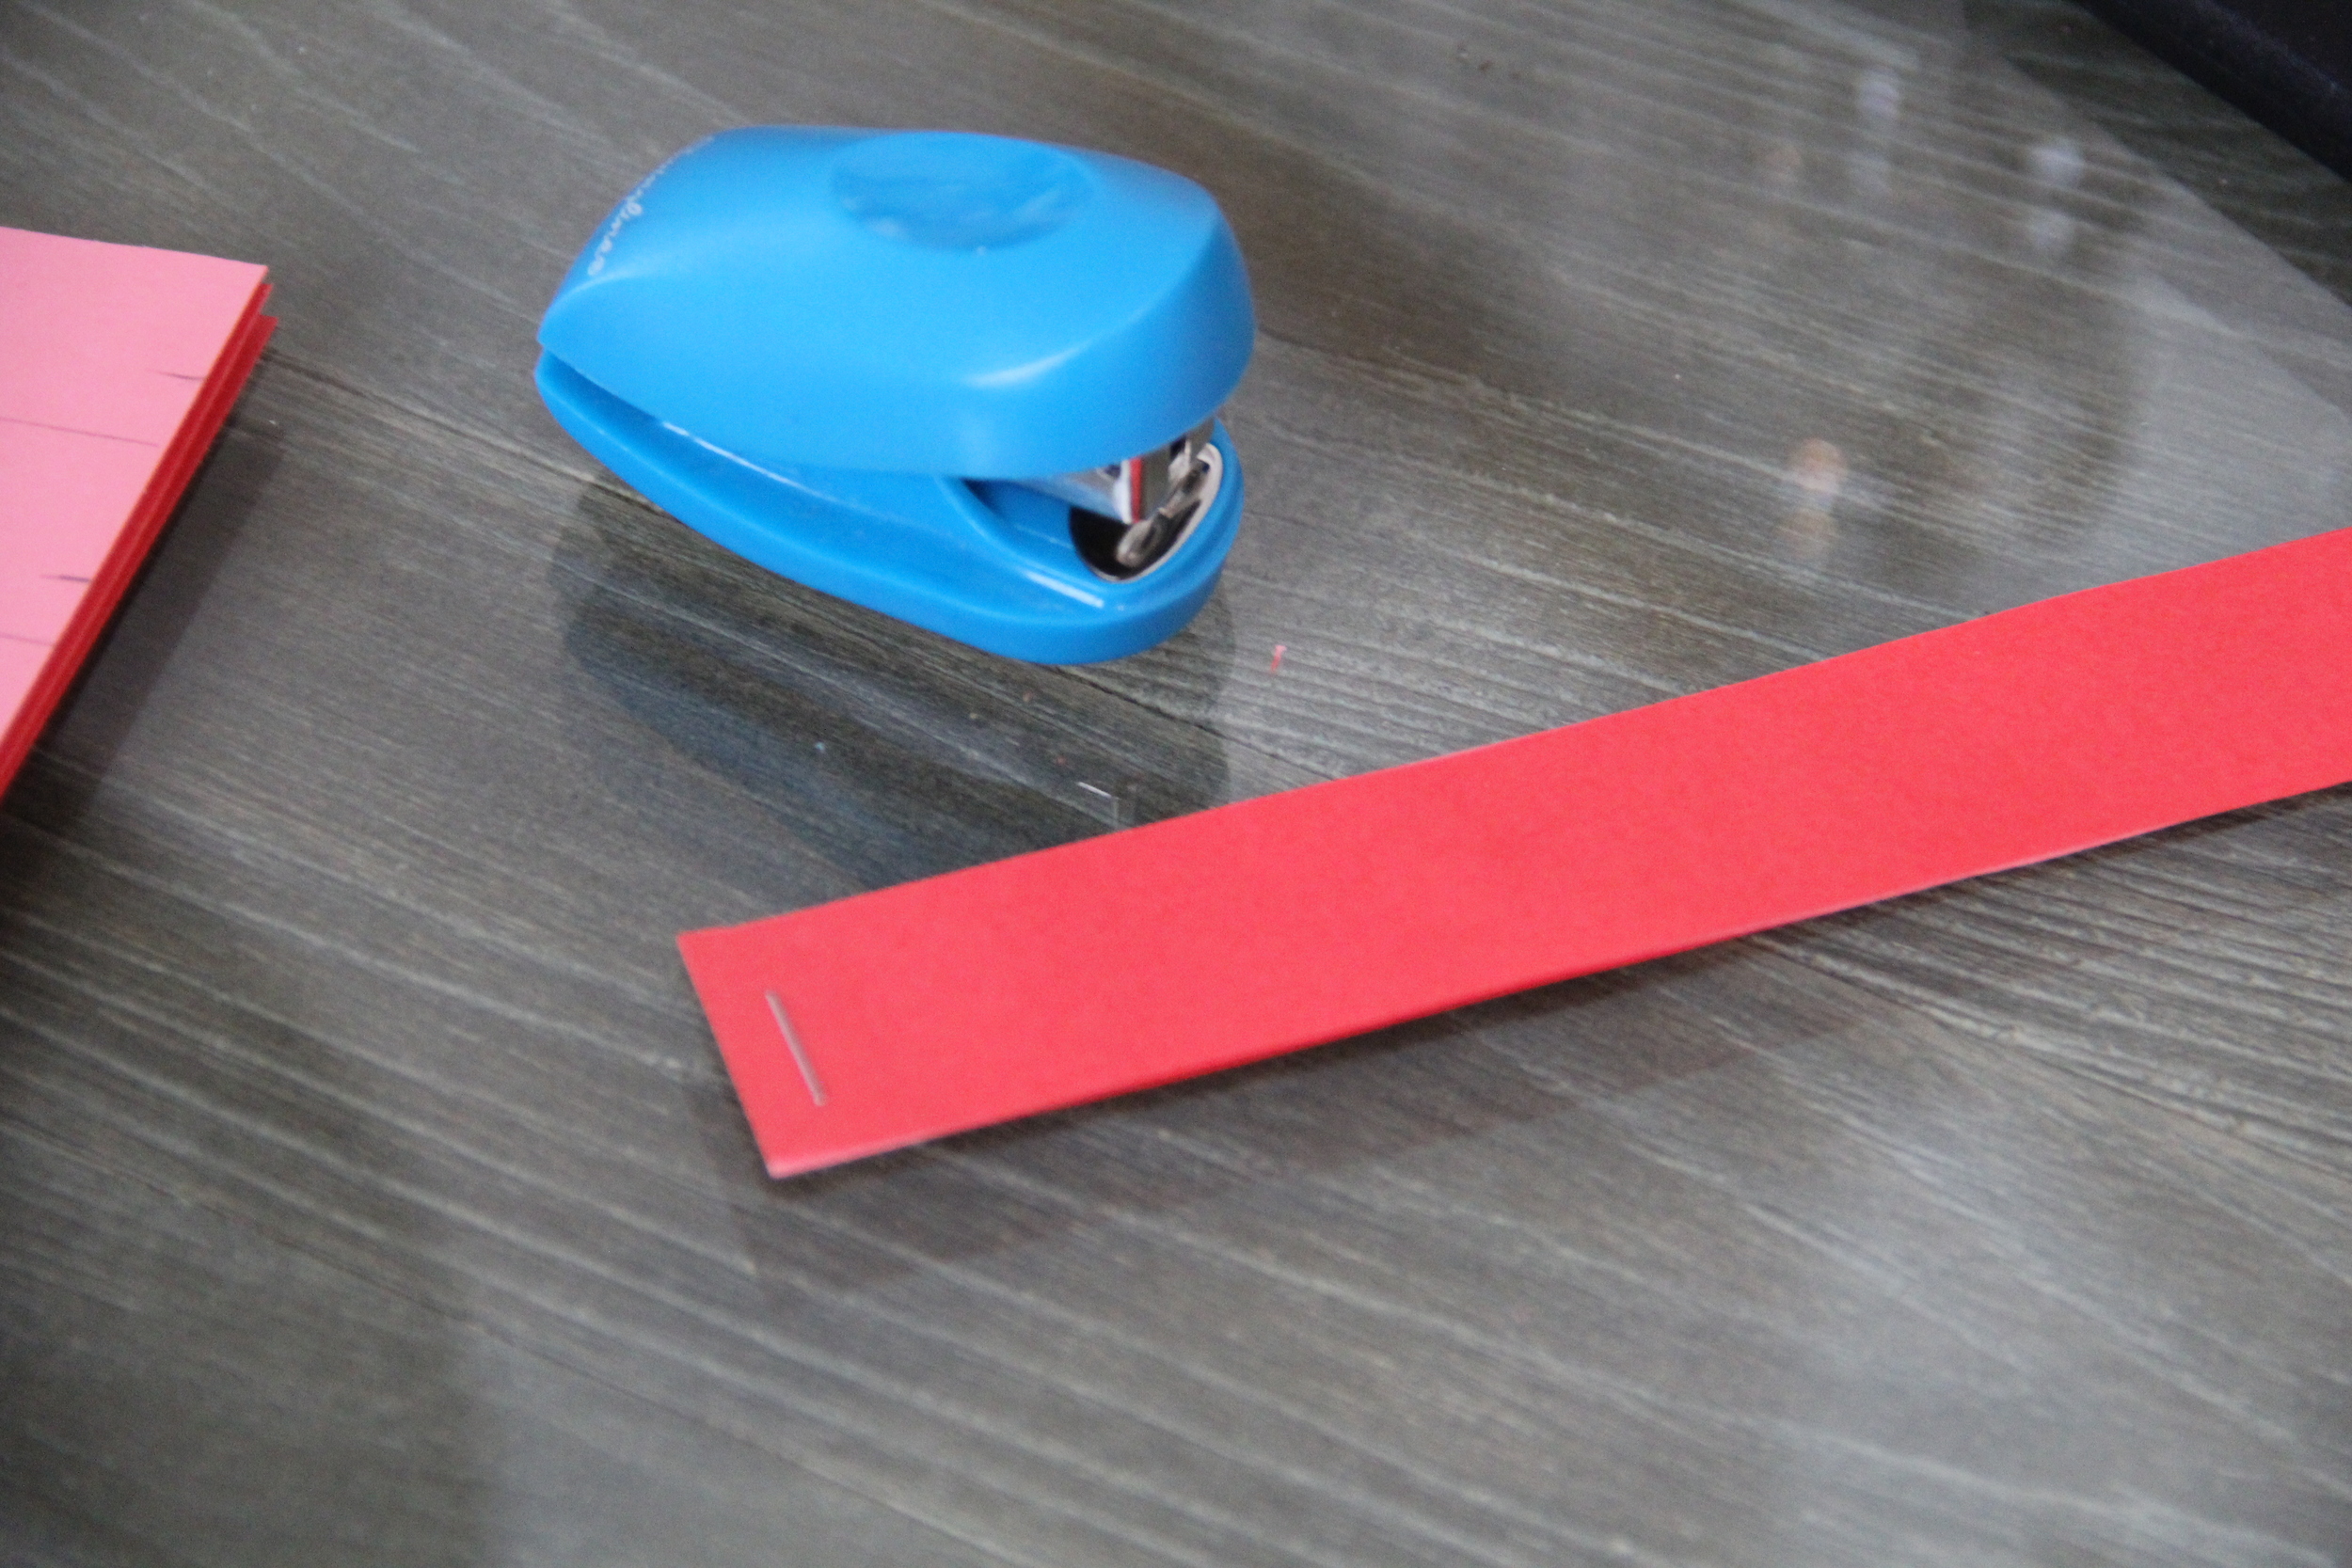
  1. Stack 2 sheets of red paper and 2 sheets of pink paper together, ordering them either pink-red-red-pink or red-pink-pink-red
  2. With a pencil and ruler, draw straight lines across the width of the paper on top of the stack, spacing the lines approximately 1 inch apart. 
  3. Keeping the stack together, cut into strips 
  4. Take one stack of strips and staple each end together, thus collating the 4 pieces together
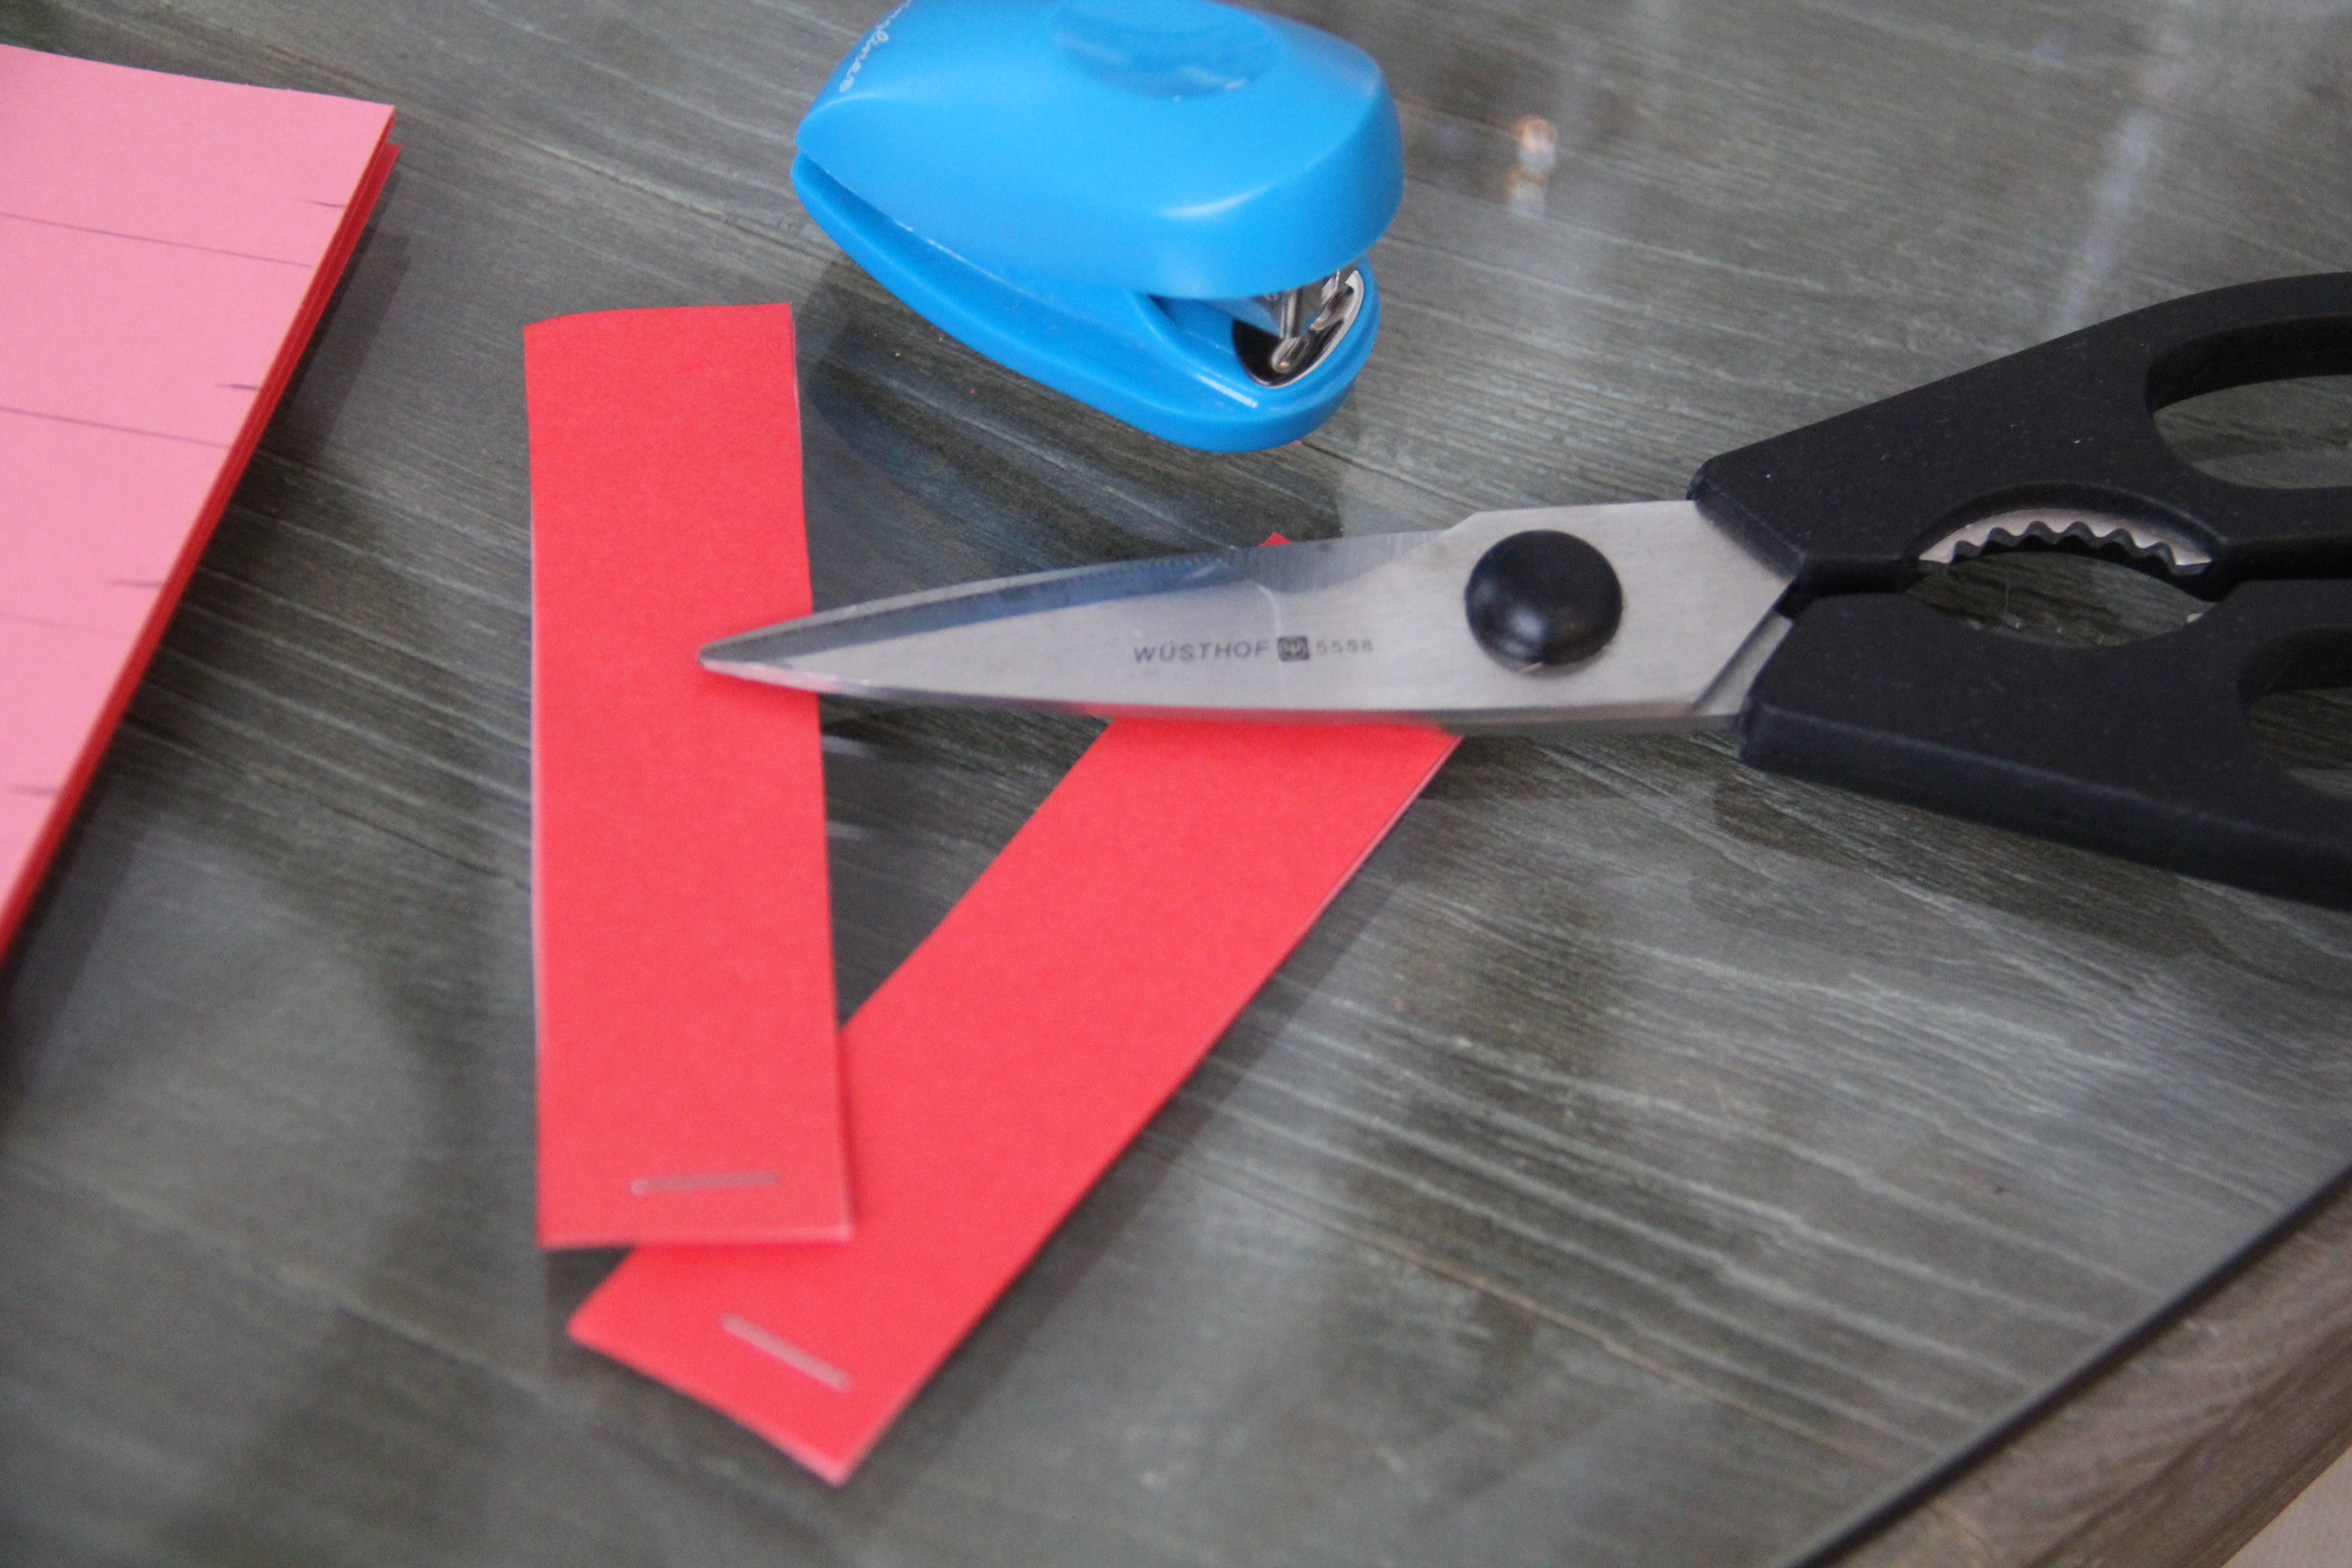
  5. Using scissors, cut the strip in half so that you have two 4 1/4" collated stacks
  6. Take one mini stack (Stack #1), peel down the two exterior strips and staple them together at the base and set aside
  7. Repeat step #6 with a second mini stack
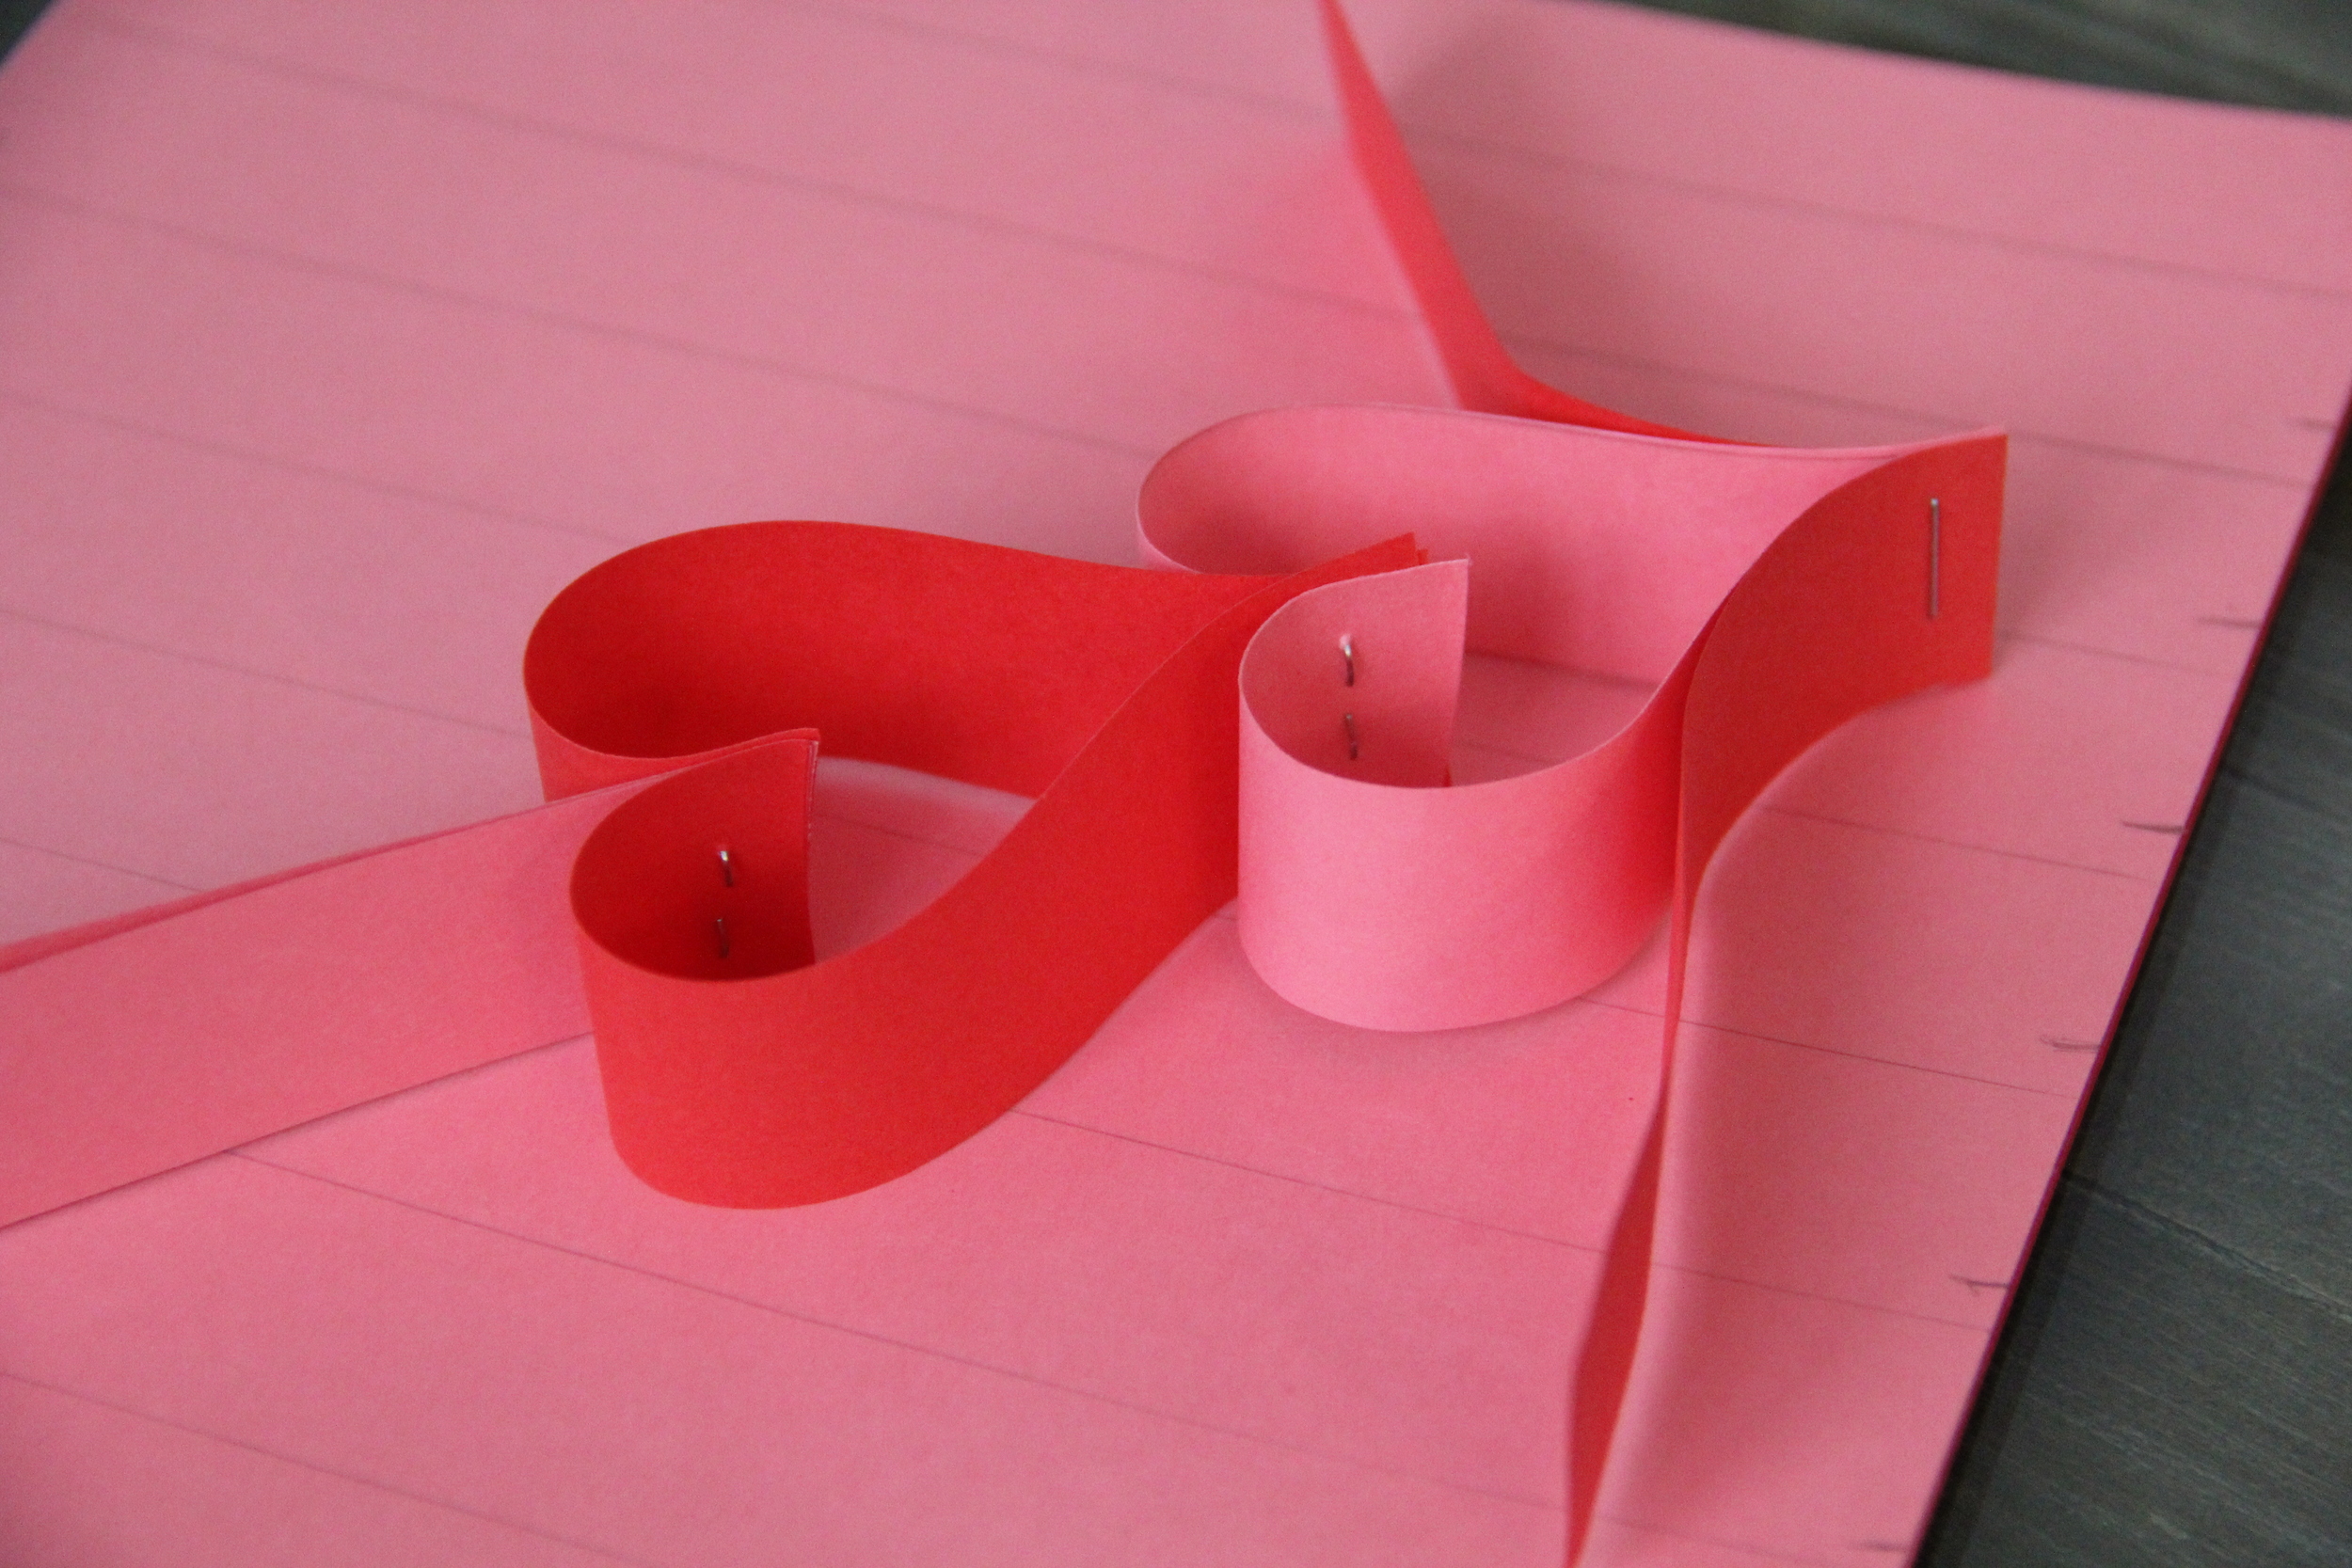
  8. Take Stack #1, bend the ends of the two interior strips inward, insert the tail of Stack #2 in-between the inverted ends from Stack #1 and staple together
  9. Repeat this process until desired length is achieved.  Reference images for more explicit directions on how to assemble garland.  

**Next week I will be unveiling my Valentine's Day Edition Bar Cart on the blog!  So stay tuned!

Valentines Day Garland 1.jpg
In Decorate Tags Valentine's Day, Garland, Decorations, Holiday Decorations, Crafts, Hearts
Comment

Trimming My Christmas Tree

December 9, 2015 Callie Cagney
IMG_3325.jpg
Redefining Domestics Christmas Tree 1.jpg

The Christmas Tree is without a doubt my favorite aspect of holiday decorating.  I kid you not, I get so excited every year to pick out our christmas tree and then spend the weekend decorating it.  The smell of a real tree in my home sings holiday season and I love the elegant (and slightly whimsical) touch it brings to my living room. 

My tree decor theme has evolved over the years.  Originally it was a traditional red, green, gold and tartan tree with an assortment of fun and very classic ornaments (i.e. a whole lot of Santa Claus on my tree).  Over the years, my taste/style has evolved first to a rustic chic and finally into it's current theme: "Woodland Chic."  

What the heck is "Woodland Chic?!"  Well to make a long story short, it is essentially rustic chic (pinecones, acorns, burlap and gold) with the addition of a few forrest animals (Moose, Owls, Snow Foxes, etc…).  I love the way this tree has come together over the years.  It certainly speaks to my style (elegant and rustic with a splash of fun) and of course I love that my tall ceilings can support a whopper sized tree (which I most definitely take advantage of).  Below is a breakdown of how I go about setting up, decorating and maintaining my christmas tree throughout the holiday season.  

IMG_3198.JPG
IMG_3200.jpg

Prepping Your Tree

  1. Lay a trash bag followed by a towel on top of the floor where you intend to have your tree stand placed
  2. Place the tree stand on top of the towel
  3. While the tree is still wrapped, place it in the stand.  Have one person hold it and the other person can stand back to assess if its standing straight and then screw the tree into place. 
  4. Once the tree is secured, fill the stand with water
  5. Cut the net off the tree and help to gently pull the branches down 
  6. If you have a tight space for your tree- use either Friskars or Wire Cutters (unconventional, but they work) to trim off the extraneous branches to help the tree fit the space.  (*Note- If you plan on making your own garland and/or wreath, save those tree trimmings!)
IMG_3202.JPG

Decorating Tips

  • Add a little tradition- trees tend to evolve over time into a large collection of memories.  Even if you prefer a more designer-esqe tree, theres no reason why you can't incorporate small touches of meaningful memorabilia.  Since my husband has German heritage, we include a pickle ornament every year.  In addition, you all know how crazy we are about our dog Dolly, so a bulldog ornament is an absolute must for our family Christmas tree. 
  • Use Wire- green floral wire is a decorating essential during the holiday season, especially when it comes to decorating my tree.  I use green wire to help hold up the ribbons of burlap, adjust branches to fill in holes, support my tree topper (which weighs 10lbs..not really, but it is heavy) and even as a tether for anchoring my tree to the wall (safety first everyone!). 
  • Lights - I love a well illuminated tree, so I tend to have a heavy hand when it comes to tree lights.  Among my favorite types of lights are garland-style lights (unfortunately not the easiest lights to find in stores).  They have three bulbs per stop, which really helps to give your tree a beautiful and very bright look.  Just make sure to buy light strands with a wattage of 100 or less.  I made the mistake of buying strands this year that had 125 watts and ended up having the lights on my tree go out three times (it was awful). 
  • Water- There is nothing worse than having a crunchy tree.  Be sure to check your tree's stand water daily or at the very least every other day.  Most homes around this time of year are running their heating systems, which causes the tree to drink even more water.  A major part of keeping your tree looking its best revolves around proper hydration.
IMG_3235.jpg
IMG_3236.jpg
IMG_3308.JPG
IMG_3314.JPG

Details on my Woodland Chic Tree

  • Gold Bulbs- Target
  • Glitter Gold Pinecones - Target
  • Shatterproof Pinecones - Target
  • Burlap Ribbon - Home Goods (similar here)
  • Burlap Tree Skirt- Home Goods (similar here)
  • Glitter Moose Ornaments - Martha Stewart Home Depot (similar here)
  • Mirror Star Tree Topper - Pottery Barn (similar here)
  • Glass Acorns- Home Goods (similar here)
  • Snow Fox Ornaments- Martha Stewart Home Depot
  • Shatterproof Owls- Target
  • Natural Wired Pinecones- Target
IMG_3301.jpg
IMG_3312.JPG
IMG_3303.jpg
IMG_3316.JPG
In Decorate Tags Christmas Tree, Decorations, Target, Home Goods, Pottery Barn, Tree Care
Comment

How to Make a Beautiful Holiday Wreath

November 9, 2015 Callie Cagney
Beautiful Embellished Wreath.jpg

 Over the weekend I spent some time working on seating and tablescaping for my upcoming Thanksgiving dinner.  It sounds crazy, but logistics for hosting a dinner party of this size and complexity requires lots of prep work weeks in advance.

I am in the final stages of fine tuning my Thanksgiving tablescape (sharing the big reveal on the blog next week!), but have been struggling with one major component...the centerpiece!  One concept I had been strongly considering was a fresh wreath made of mixed greenery encircling a big hurricane with a three-wick candle in the center.  In my mind this sounded like a great idea, but I needed to test it out before committing.

The results?  Let me just say that I am so glad that I took the time to test out this concept. It was obvious as soon as I placed the wreath on the table that it most definitely was not going to work as a centerpiece for this tablescape, however it did look fabulous on my front door.  

Why am I sharing this DIY?  The holiday season is pretty much here and wreaths tend to be a decor essential.  While I am constantly wishing that I could buy one of the many luxe wreaths sold in some of my favorite home stores, there is no way that I can justify spending $130 on something that will be dead in a few months.  DIY wreaths are not hard to make and cost a fraction of the price of those fancy store bought wreaths.  In addition, you have the ability to customize your wreath to meet your exact aesthetic specifications.  Here is how you can make your own beautiful wreath to adorn your home this holiday season. 

wtreath supplies 3.jpg
Trader Joes Grapevine Wreath.JPG
Greenery.jpg
Wire Cutters and Wire.JPG
Wreath Supplies.JPG
Wreath Embellishments.JPG

Materials:

  • Trader Joe's Grapevine Wreath for $3.99! (Similar here)
  • 22 Gauge Paddle Wire
  • Wire Cutters
  • Sharp Scissors or Branch Clippers
  • Greenery: Myrtle, Eucalyptus, Fern, Pine, etc.
  • Wreath Embellishments (Similar here)

Instructions:

  1. Gather approximately 4-5 pieces of an assortment of greenery that has been trimmed to between 6-8inches in length
  2. Using a piece of 6inch green wire, wrap the base of the greenery bunch tightly
  3. To secure the greenery onto the wreath, cut an additional 6 inch piece of green wire and weave it through the grapevine wreath, then place your greenery bunch base over the piece of wire that has been woven through the wreath and use the wire to secure the bunch by twisting it tightly on top of the bunch (see image below).
  4. Continue steps 1-3 until the entire wreath is covered with greenery bunches, making sure to overlap each bunch as you go around the wreath in order to hide the wiring.  
  5. Once your wreath is covered in greenery, insert desired embellishments.  My embellishments did not require additional wiring to secure.  I merely inserted them into the desired locations and both the greenery and grapevine base held them in place.  
  6. Your wreath will only last a few days, however, if you mist it every other day with a little water, a wreath of eucalyptus will dry beautifully and last for a few months.
Greenery Bunches 2.JPG
Greenery Bunches.JPG
Wire Twisting.JPG
Wreath Making 1.JPG
Wreath Making 2.JPG
Wreath Making 3.jpg
Embellished Wreath.jpg
In Decorate Tags Greenery, Decorations, Thanksgiving, Christmas, DIY, Trader Joe's
Comment

Host a Pumpkin Carving Party

October 28, 2015 Callie Cagney
Pumpkin Carving 3.JPG

This past Friday, I invited a small group of friends over to my house for cocktails and pumpkin carving.  Since none in this group (myself included) has kids, which is typically the most compelling reason for carving pumpkins, we had been missing out on this fabulous holiday tradition for quite some time.  So as you could imagine, the response from my guests to this party invitation was an enthusiastic "yes!".  After extensive plotting and planning, I came up with a pumpkin carving party that struck a perfect balance of sophistication with splashes of festive Halloween accents thrown into the mix. Below is a breakdown of the various elements from my recent pumpkin carving party, filled with great ideas and tips on how you can recreate this holiday tradition with your own group of friends!

IMG_1938.JPG

Pumpkin Carving Station

Since there were a fair number of us carving pumpkins, I decided to transform my dining room table into the pumpkin carving station.  Here is a list of the supplies I used to create this space:

Carving Station 2.JPG
  • Disposable Painting Tarp
  • Pumpkins
  • Set of Assorted Foam Brushes
  • Carving Knives (I just used my favorite Victorinox Steak Knives)
  • An assortment of paints (see this post for more details)
  • Glitter 
  • Glue
  • Tea Lights
  • An assortment of Halloween candies (to keep everyone's energy levels up)
  • Free Pumpkin Stencils courtesy of Better Homes and Garden (so many fabulous options!)
Halloween Candy.JPG

Pumpkin Trivia

Instead of just sitting around the table carving pumpkins in silence or with generic conversation, I thought it would be a fun idea to take this time to share a little pumpkin trivia with my guests.  Not only was it fun to see what my friends knew about pumpkins, but it also added an extra element of fun to the party.  This site has everything you need to know about pumpkins. 

Jack o lantern.JPG

Food and Beverage

What cocktail party of mine would be complete without a cheesescape?!?  Here is a breakdown of what I served at this party:

  • Cheeses: Jasper Hill Farm Clothbound Cheddar, Cypress Grove Midnight Moon, Cypress Grove Humboldt Fog
  • Chutney: Virginia Chutney Co. Balsamic Fig Chutney
  • Crackers: Raincoast Flats Kale and Walnut, Dr. Kracker Pumpkin Seed Cheddar
  • Ina Garten's Tomato Crostini with Whipped Feta
  • Other Nibbles: Edamame, Somersaults, Assorted Nuts, Veggies and Hummus
  • Wine: Napa Cellars Pinot Noir
Cheesescape.JPG

Goody Bags

What Halloween party would be complete without a little Trick or Treat!  Well, in our case it was more of a nod to Trick or Treating.  Each guest received a goody bag and mini bottle of Prosecco at the end of the evening  to take home along with their carved pumpkin. See my post on Halloween Treat Bags for more details.

Goody Bags.JPG

This party was a huge hit with my friends and the perfect culmination of the various projects I had been sharing throughout this past month.  Even though it may seem at times like pumpkin carving should be more of a kid centric activity, there are so many ways to enhance the sophistication level of this activity, ultimately making it worthy of adults and even a cocktail party!  

IMG_1346.JPG
In Entertain Tags Fall Entertaining, Arts and Crafts, Candy Corn, Halloween, Candy, Cheesescape, Gift Bags, Decorations, Cocktail Party, Pumpkins
Comment

Easter Tablescape

March 30, 2015 Callie Cagney
Easter Tablescape Gold Dahlias4.jpg
Easter Tablescape Gold Dahlias2.jpg
Easter Tablescape Gold Dahlias.jpg

Easter is right around the corner and my holiday preparations are in full swing.  As I mentioned in my post on Spring Cheesescaping, this is the first major holiday where I will be hosting my family for dinner.  In preparation for this hostessing first, I wanted to create a beautiful table setting that is both festive and elegant.  

In order to create an elegant yet festive look, this tablescape required a mix of both formal and informal tableware.  A few examples of how I achieved this balance include:

  • Framing my formal china with my everyday dinner plates 
  • Topping my simple white tablecloth with beautiful gold placemats
  • Pairing my everyday green goblets with my formal crystal wine glasses.  

In addition to sharing my formal/informal pairings, here is a breakdown of everything I used to create this Easter tablescape:

  • Placemats: Chilewich Gold Pressed Dahlia Placemats
  • Dinner Plates: Pillivuyt Basketweave Dinner Plates
  • Accent Plates: Bernardaud Constance Salad Plates
  • Napkins: Kim Seybert Meander Embroidered Napkins
  • Napkin Rings: Brass Napkin Rings
  • Steak Knives: Laguiole Ivory Steak Knives
  • Water Glasses: Villeroy & Boch Boston Goblets (Green)
  • Wine Glasses: William Yeoward Fanny Wine Goblets
  • Place Card Holders: Target Threshold Bunny Placecard Holders
  • Nests: Touch of Nature Wild Grass Nest
  • Glitter Eggs: Boston International Green Glitter Eggs
  • Bud Vases: Libbey Adorn Hurricane Vases
  • Votives: Tiffany & Co. Rock Cut Votives
  • Brass Tray: Barreveld International Iron Round Tray

Flowers

Lilies and Easter go together like peanut butter and jelly!  Even though I am not using white Easter lilies on this table, it still seemed very fitting to opt for bright pink calla lilies to add a pop of Spring color.  To finish the look, I divided a dozen bright pink roses into four small glass bud vases and placed them around the table.  The addition of the roses created a substantial presence for the color pink so that it didn't seem completely random in the sea of green, white and gold.   

Easter Tablescape Gold Dahlias3.jpg
Easter Tablescape Gold Dahlias5.jpg
Easter Tablescape Gold Dahlias10.jpg

My Easter Dilemma

I would like to think that my Easter Tablescape has been finalized, but there is one small detail that has been preventing me from moving on to the next task on my Easter Prep Checklist.  

As part of my process for creating a tablescape, I switch in and out a bunch of different table accessories before finding the perfect look.  Typically this is a fairly effective process, but this time it backfired.  One of my biggest challenges with this tablescape has been trying to determine whether or not I should include my rattan chargers.   They tie in beautifully to this scape because of the dried grass birds nests, but for the life of me I cannot make a decision because I like both looks.  If you have any thoughts on whether or not I should use the chargers for dinner this weekend, please leave a comment.  I would greatly appreciate any/all suggestions as I am totally stumped!

Even if you can't decide whether or not I should incorporate the rattan chargers, I hope you have a wonderful Easter holiday filled with family, memorable moments and maybe even a little tablescaping of your own. 

Easter Tablescape Rattan Chargers.jpg
Easter Tablescape Rattan Chargers8.jpg
Easter Tablescape Rattan Chargers 2.jpg
Easter Tablescape Rattan Chargers5.jpg
In Entertain Tags Easter, Tablescape, Decorations, Holiday, Bunny, Easter Eggs
1 Comment

Subscribe to the Redefining Domestics Blog:

Thank you!

Categories:

  • Decorate (64)
  • Entertain (71)
  • Food and Drink (103)


Latest Posts by Category:

Featured
IMG_1993.JPG
Entertain
Pinterest Worthy Halloween DIYs
Entertain
Entertain
Featured
IMG_8787.jpg
Decorate
How to Hang a Lighting Fixture
Decorate
Decorate
Featured
IMG_1694.JPG
Food and Drink
A Healthy Recipe for Homemade Granola
Food and Drink
Food and Drink

Instagram 

http://instagram.com/calliecagney

View fullsize We are lucky to have you in our sphere Chris Kalna!❤️ #happyfathersday #girldad #cookiebaking #suttonbutton #lovethem
View fullsize National Puppy Day with my two toddlers❤️ #suttonbutton #jolene #nationalpuppyday #jojosbathtubfomo😂
View fullsize Bibbidi Bobbidi Boo, she’s 2! Happy Birthday Sweet Girl💙 #suttonbutton #halloween #cinderella #happybirthday #shestwo!
View fullsize Fourth of July Vacay is already off to a fun start❤️💙⛱ #fourthofjuly #mountains #thesetwo #ggccsummer2019
View fullsize This little girl turned 1 on Halloween! Sutton, you are pure joy! Happy Birthday sweet girl! #suttonbutton #happybirthday #halloweenbaby #birthdaycake #diy #beaufortbonnet
View fullsize Our first 4th of July as a trio❤️💙 #happyfourth #familyphoto #skr #suttonbutton #vacation #northcarolina
View fullsize First day of vacation with these two loves💙 #thecutest #vacation #july4th #mountains #sKr #suttonbutton #beachingit #waterbaby
View fullsize Happy First Father’s Day to this stud muffin! You bring a lot of joy and sports watching to our lives. The Ladies Kalna are lucky to have you!❤️ #Fathersday2018 #chrissums #sKr #socute #luckyus #moreusopenplease
View fullsize Girlfriends kicking off MDW together💕🐳🛁 #suttonandmadden #mdw #littlebesties #bathtime #toocute
View fullsize Baby’s first Christmas tree 🎄 #deckthehalls #sKr #christmastree #happysunday
View fullsize Baby sKr’s jammie game is on point🙌🏻❤️ #thingstodo #retailtherapy #stillpregnant #petiteplume #potterybarnkids #babyclothes #toocute #babygirl #pajamaparty
View fullsize My husband and I joke about Baby K’s “master suite.” Clearly we’re both struggling with a case of bedroom envy😂 #stillpregnant #babynursery #iviebaby #glitterguide #mypotterybarn #serenaandlily #babygirl #skr #projectnursery

Pinterest

http://www.pinterest.com/calliecagney/

Follow Callie Cagney's board Home Decorating on Pinterest.
Welcome RSS

© 2016 Redefining Domestics. All Rights Reserved.